
1. Enter the Location and Time
- Enter the pick-up address in the “pick-up” field and the destination address in the “Drop-off” field. You can also drag the pick up
![]() and drop off
and drop off ![]() flags into the map at the center of the screen.
flags into the map at the center of the screen.
- If the job contains more stops in the way you can add these by clicking on the blue + sign between the pick-up and drop-off flags. You can add up to 5 additional stops. If you want to remove a stop, click on the red minus sign button next to it.

- Select now, if you would like the job to start immediately. This will become an ASAP job in the job list on the right side of the screen. Otherwise, choose later and select the desired time and date.

Below the label “assigns” is a list from which you can select a “T-minus” time. This will determine the time when a job will be assigned to a vehicle before the job is set to start. For example, if your customer would like a taxi at 8:00 AM you could choose a Tminus time of 15 minutes so that the driver has the job assigned to them at 7:45 and thus has time to get to the right location.
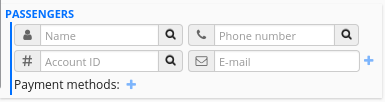
2. Enter information about the passenger
- Enter the name of the passenger and their phone number in the input fields under PASSENGERS
- Set the number of passengers, bags, wheelchair availability, and how many vehicles may be needed for this job. If you need to specify a certain vehicle type, for example, “Minibus”, you can also do it in this section.
- You also have the option to enter information about the job that may be useful for the driver to know, for example, “Needs help with luggage”.

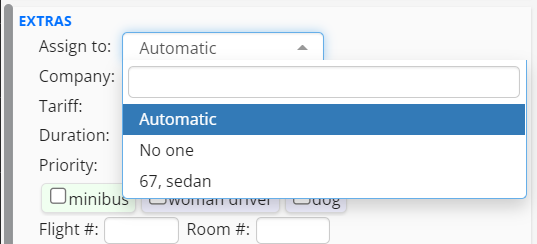
3. Enter extra information
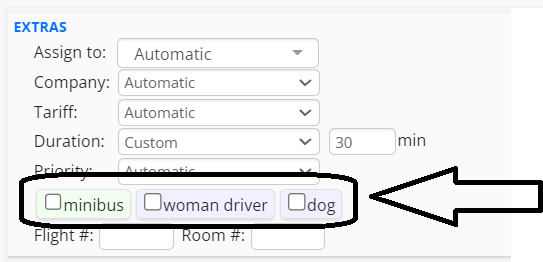
From the EXTRAS you can add more detailed information to the job and make it more specific.

Assign to Allows you to assign the job to a specific vehicle, by default is ‘‘Automatic’‘.
Company Allows you to assign the job to a specific company in case you have multiple companies profile.

*Tariff’‘ You can select the specific tariff that was set, or, use the ‘‘Custom tariff’‘ when you can choose the price you want to charge.

TAX This field is only available if the ‘‘Custom tariff” has been selected, and allows you to choose the tax rate to be applied to a custom tariff job.

Duration In this field you can select the duration of a job, it can be taken from the ‘‘Estimates’‘ for the job or you can choose the custom option and select how long would be the job duration.

- Using priorities: You can give priorities to your jobs, from 1 being the lowest and 5 being the highest. The higher priority jobs will be auto-assigned first compared to the lower priority ones. This will allow you to give preferences to jobs marked with higher priority levels, you can use this if you have VIP customers, for example.

Tags Additionally, you can select tags to further customize the job to your passenger’s needs. For example, if the passenger is non-smoking, you may choose a vehicle with this tag. You are able to create and apply any tag to both vehicles and drivers from the Admin Panel.
Flight # It can be added if the passenger is going from or to an airport or hotel, you can specify the flight and room number.

p(banner tip). If you wish for the higher priority jobs to also block other jobs until they have been assigned, you can change this from the admin panel in: Settings > Dispatch > 2. Assignment > Priorities
4. Check and Book the job you just created.
- Click on check in order to get a preview pop-up for the job with an estimated price and estimated time for pickup.
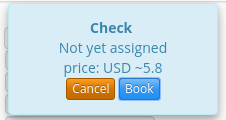
- Click on book either in the check pop-up or the main button in order to create the job. In the latter case, you will receive a pop-up confirmation.

- The Prev. Return button can be used if you want a return ride for a previously entered ride. You can learn more about this in the next section Modifying an existing job
- Use the Clear button to clear the form entirely and start over.